In this tutorial we use PADrend’s post processing effects (in the following abbreviated by pp-effect) to implement a Sobel filter. You can read more on the filter at Wikipedia.
Sobel filter
The Sobel filter is used to enhance edges in an image. Therefore an approximation of the image’s first derivative in x and y direction is calculated by using two filter masks. You can see both filters in the image below.

We will apply both filters in our effect. This is done by looking at a pixels and its eight neighbors around it. Assume the filter mask is centered at the current pixel. Each pixel of the neighborhood is multiplied by the corresponding weight in the filter mask. All weighted pixels are summed up resulting in a single value per pixel. In our output image we want to display the gradient’s magnitude. Therefore we use the equation below.

Post processing effect in PADrend
For pp-effects there is an abstract base class. You can find it under plugins/Effects in the main folder of PADrend. The class is called PPEffect. If you want to write your own pp-effect, you need to inherit from this class. The file, containing your new effect, must be placed in the PPEffect folder. To execute your pp-effect select the Effects menu in PADrend. Navigate to PP effects. Here you should find your effect. Note that there is also a Options… entry in the menu. Here you can add settings for your effect. The abstract class offers some call back methods that you can overwrite. By default the methods are empty, so that you only have to overwrite the methods that you need.
- begin(): This method is called before the rendering.
- end(): This method is called after the rendering.
- beginPass(RenderingPass pass): This method is called before a rendering pass. The pass is passed as parameter.
- endPass(RenderingPass pass): This method is called after a rendering pass. The pass is passed as parameter.
- getOptionPanel: Here you can implement a panel for setting your effects options (such as parameters). Return the panel at the end of the method. When you hit the Options.. button a window containing your panel will be opened.
Overview of edge enhancement effect
PP-effects are applied to the rendered image. In order to get access to this image, we use a frame buffer object to render to a texture. After that we use a shader to apply the Sobel filter. Therefore we activate the shader and render the image to another texture. This texture is rendered to the screen in a third step.
Constructor: Setting everything up
Lets first create a new frame buffer object and set it active.
this.fbo := new Rendering.FBO;
renderingContext.pushAndSetFBO(fbo);
Next up we create our two textures. colorTexture_Input will held the original image, while _colorTexture_Output will held the result of applying both filter masks. We attach the first texture to the frame buffer object to ensure it was correctly initialized. After that we also create a depth texture. It will not be needed for the effect itself, however it ensures depth test to be applied.
this.colorTexture_Input := Rendering.createHDRTexture(renderingContext.getWindowWidth(), renderingContext.getWindowHeight(), true);
this.colorTexture_Output := Rendering.createHDRTexture(renderingContext.getWindowWidth(), renderingContext.getWindowHeight(), true);
fbo.attachColorTexture(renderingContext, colorTexture_Input);

this.depthTexture := Rendering.createDepthTexture(renderingContext.getWindowWidth(), renderingContext.getWindowHeight());
fbo.attachDepthTexture(renderingContext, depthTexture);
We check whether everything is okay and than pop the frame buffer object.
out(fbo.getStatusMessage(renderingContext), "\n");
renderingContext.popFBO();
The last thing we need to do is loading the shaders. To make it more compact, the shaders are included in the pp-effects file. However you can also split the shaders and put them into the resoureces folder which you can find in the plugins/Effects folder. In this case you would need to use loadShader instead of createShader and pass the path to both shaders to it. We create the shader by calling createShader. The two variables vertexShader and fragmentShader contain the corresponding shaders as string values. We activate the shader and bind its variable TUnit_1 to the first texture unit. After that we deactivate the shader.
this.shader := Rendering.Shader.createShader(vertexShader, fragmentShader);
renderingContext.pushAndSetShader(this.shader);
shader.setUniform(renderingContext,'TUnit_1', Rendering.Uniform.INT, [0]) ;
renderingContext.popShader();
The Shaders
The vertex shader is a simple pass through shader. It takes a vertex and transforms it.
static vertexShader = "
void main(void)
{
  gl_Position = ftransform();
  gl_TexCoord[0] = gl_MultiTexCoord0;
}
";
The Sobel filter itself is implemented in the fragment shader. First of all we need two variables to pass input to the shader. Here TUnit_1 holds the input image. We will need the size of a pixel (pixelSize) to convert from a pixel position to a texture coordinate. The function getColor(float x, float y) accesses the input image and collects the color at a given texture coordinate. It converts the color to gray scale and returns it. In the main we first define the vertical and horizontal filter mask. Next up we collect the texture coordinates of the pixel we want to evaluate. In addition we need three variables to compute the result of the filtering. Two variables (color_x and color_y) are used to accumulate the weighted neighborhood pixels. The third one will held the resulting magnitude. To evaluate the filter mask we simply use two for loops, which iterate over the filter masks. We collect the color for each neighborhood pixel and multiply it with the corresponding weight from the filter mask. This is done for both filter masks. After the for loops we calculate the magnitude by the square root of the squared sum of both derivative. The magnitude is used as color value for the current pixel.
static fragmentShader =
"
uniform sampler2D TUnit_1;

uniform float pixelSize;

float getColor(float x, float y){
    vec3 color = vec3(texture2D(TUnit_1, vec2(x,y)));
    return (color[0] + color[1] + color[2]) / 3.0;
}

void main(){
    mat3 filterKernelGx = mat3(1, 0, -1, 2, 0, -2, 1, 0, -1); // Gx sobel filter mask
    mat3 filterKernelGy = mat3(1, 2, 1, 0, 0, 0, -1, -2, -1); // Gy sobel filter mask

    float x = gl_TexCoord[0].s;
    float y = gl_TexCoord[0].t;

    float color_x = 0;
    float color_y = 0;
    float color = 0;

    if(x-pixelSize > 0.0 && x+pixelSize < 1.0 && y-pixelSize > 0.0 && y+pixelSize < 1.0){
        for(int xOffset = -1; xOffset <=1; xOffset++){
            for(int yOffset = -1; yOffset <=1; yOffset++){
                color_x += getColor(x + (xOffset * pixelSize), y + (yOffset * pixelSize)) * filterKernelGx[xOffset + 1][yOffset + 1];
                color_y += getColor(x + (xOffset * pixelSize), y + (yOffset * pixelSize)) * filterKernelGy[xOffset + 1][yOffset + 1];
            }
        }
    }

    color = sqrt(color_x*color_x + color_y*color_y);

    gl_FragColor = vec4(color, color, color, 1);
}
";
Before and after rendering
Since we want to render to texture, in the begin method of our pp-effect we need to activate the frame buffer object. After the activation we bind the texture for the input image and the depth texture to it. Now the scene is rendered so that colorTexture_Input contains the input image for the Sobel filter shader.
Effect.begin @(override) ::= fn(){
    renderingContext.pushAndSetFBO(fbo);
    fbo.attachColorTexture(renderingContext, colorTexture_Input);
    fbo.attachDepthTexture(renderingContext, depthTexture);
};
After the rendering we apply our Sobel filter to the texture colorTexture_Input. We remove the depth texture from the frame buffer object and activate the shader. We set the size of a pixel to 1/renderingContext.getWindowWidth() as 1 is the biggest texture coordinate and the number of pixel in direction x is renderingContext.getWindowWidth(). Next up we replace the rendering target, since the result of the Soble filter should be stored in colorTexture_Output. Rendering.drawTextureToScreen renders the input texture. Since we have activated the shader, it will be applied to the texture. After this step colorTexture_Output contains the filtered image. The last thing we need to do is rendering this texture to the screen. Therefore we first deactivate the frame buffer object and shader and activate an empty shader. Next up we again use Rendering.drawTextureToScreen to display the texture and deactivate the empty shader.
Effect.end @(override) ::=fn(){
    fbo.detachDepthTexture(renderingContext);

    renderingContext.pushAndSetShader(shader);
    shader.setUniform(renderingContext,'pixelSize', Rendering.Uniform.FLOAT, [1.0/renderingContext.getWindowWidth()]) ;

    fbo.attachColorTexture(renderingContext, colorTexture_Output);
    Rendering.drawTextureToScreen(renderingContext, new Geometry.Rect(0,0,renderingContext.getWindowWidth(), renderingContext.getWindowHeight()),
                                  this.colorTexture_Input, new Geometry.Rect(0,0,1,1));

    renderingContext.popFBO();
    renderingContext.popShader();
    renderingContext.pushAndSetShader(void);
    Rendering.drawTextureToScreen(renderingContext, new Geometry.Rect(0,0,renderingContext.getWindowWidth(), renderingContext.getWindowHeight()),
                                  this.colorTexture_Output, new Geometry.Rect(0,0,1,1));
    renderingContext.popShader();
};
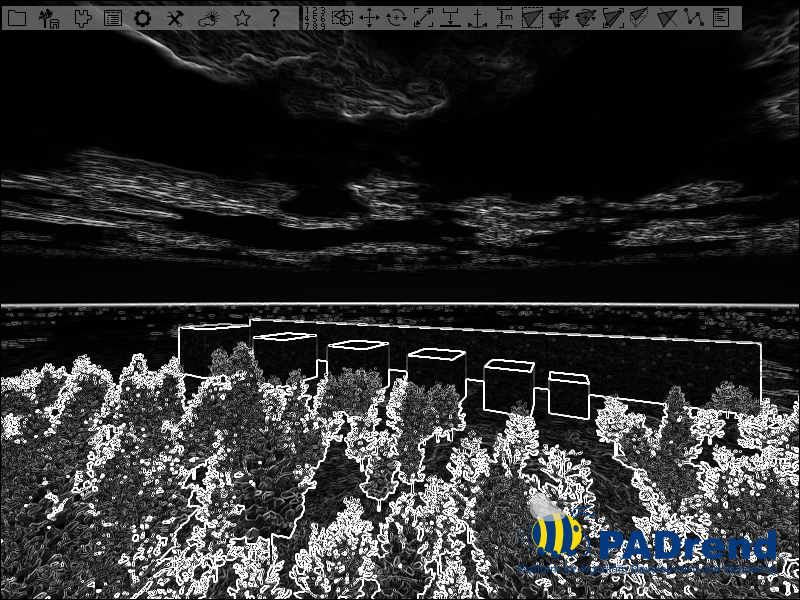
If we apply the effect to scene_1 the result looks like in the image below.