Building an image viewer. Part 3: The interaction tools
So far our image viewer is capable of showing images. However we want to enhance its features by two tools. The first tool is the drawing tool which can be used to do simple drawing on the current image. The second tool adds the ability of scrolling large images by moving the mouse.
Goal of this tutorial
In this tutorial you learn how PADrend’s mouse listener is used. It also shows how you can build your own dialogs. For the drawing tool basic image manipulation will be introduced.
Interaction tools
Basically both tools need mouse input.
Since we want to implement the mouse listener only once, its input is delegated to the tools.
Therefore there are some delegation methods, which are common for both tools.
Lets put them in an “abstract” superclass and refine them for each tool.
First we need a class Tool.
Both of the interaction tools inherit from Tool.
static Tool = new Type();
Nextup we add the common methods to it, which are empty for a generic tool. The three methods correspond to the different mouse events:
- mouseDown: Is called when the mouse button is pressed down. The current mouse coordinate and the mouse button are passed to it.
- mouseUp: Similar to mouseDown but called when the mouse button is released.
- mouseMove: Is called when the mouse is moved. Beside the coordinate and button also the delta in position is passed
Tool.mouseDown := fn(x, y, button){};
Tool.mouseMove := fn(x, y, dx, dy, button){};
Tool.mouseUp := fn(x, y, button){};

static DrawTool = new Type(Tool);
static MoveTool = new Type(Tool);
The drawing tool
This tool is used to draw on an image. To keep the tool simple, on drawing we just color some pixels around the current mouse position. Since the drawing tool needs access to the current image, it has a reference to the image. Also we need some color which is used for the drawing. Both a saved as attributes. Since the image as well as the color can change during runtime, there are also setters to set them.
DrawTool._constructor := fn(color = Util.Color4f(0,0,0,1)){
    this.image := void;
    this.color := color;
};

DrawTool.setColor := fn(color){
    this.color = color;
};

DrawTool.setImage := fn(image){
    this.image = image;
};
Next up we need a method that colors the pixels around a coordinate. For better visibility, we do not only color a single pixel, but also it eight neighbors. To access the pixels of an image, we need to get a PixelAccessor from the image. We can use the method writeColor of the PixelAccessor, to color a single pixel. This method is called in two for-loops, which iterate over the pixels neighborhood. Before we set a pixels color we first need to check whether the current coordinate is within the images bounds. After we have colored all necessary pixels, we call dataChanged on the image, so that it gets updated.
DrawTool.paintPixel := fn(x,y){
    if(!this.image)
        return;

    if(!this.color){
        outln("No color set!");
        return;
    }

    var accessor = this.image.getImageData().createPixelAccessor();

    for(var px = x-1; px <= x+1; px++)
        for(var py = y-1; py <= y+1; py++)
            if(px >= 0 && py >= 0 && px < accessor.getWidth() && py < accessor.getHeight())
                accessor.writeColor(px, py, this.color);

    this.image.dataChanged();
};
In the delegation methods paintPixel is called and the current mouse position is passed to it. Before we call the function we first make sure that the left mouse button is pressed. Note that this check differs for mouseMove since the listener receives a mask instead of a single button for this event.
DrawTool.mouseDown = fn(x, y, button){
    if(button == Util.UI.MOUSE_BUTTON_LEFT)
        this.paintPixel(x, y);
};

DrawTool.mouseMove = fn(x, y, dx, dy, button){
    if(button == Util.UI.MASK_MOUSE_BUTTON_LEFT)
        this.paintPixel(x, y);
};

DrawTool.mouseUp = fn(x, y, button){
    if(button == Util.UI.MOUSE_BUTTON_LEFT)
        this.paintPixel(x, y);
};
The move tool
The move tool can be used to scroll an image. Therefore it manipulates the scrollbars of the image panel. A reference of the panel is saved as attribute.
MoveTool._constructor := fn(imagePanel){
    this.imagePanel := imagePanel;
};
For the scrolling itself we create a method. It takes the delta in position and shifts the scrollbars by it. To ensure correct scrolling we need to invert the delta values. For the new scroll position we add the delta to the old scroll position. We use the method scrollTo in order to scroll to the new position.
MoveTool.scroll := fn(dx, dy){
    if(!this.imagePanel)
        return;

    var delta = new Geometry.Vec2(-dx, -dy);

    var oldPosition = this.imagePanel.getScrollPos();
    var newPosition = oldPosition + delta;

    this.imagePanel.scrollTo(newPosition);
};
Since we only scroll on mouse moves, it is enough to overwrite mouseMove. Again we check for the correct button and than call the scroll method we have just created.
MoveTool.mouseMove = fn(x, y, dx, dy, button){
    if(button == Util.UI.MASK_MOUSE_BUTTON_LEFT){
        this.scroll(dx, dy);
    }
};
Some new attributes to hold the tools
In order to manage the tools we need some new attributes. First of all we need two attributes holding a reference to an instance of each tool. Next up we need an attribute to held the currently selected tool. We initialize it with a generic tool. In this way we do not need to handle null pointers in the listener’s function. In addition we need an attribute that handles the color for the drawing tool. We use a data wrapper for this purpose and apply a call back function to it.
this.pencileColor  := new Std.DataWrapper(new Util.Color4f(0, 0, 0, 1));

this.drawTool := new DrawTool(this.pencileColor());
this.moveTool := new MoveTool(this.imagePanel);
this.currentTool := new Tool();

this.pencileColor.onDataChanged += [this.drawTool] => fn(drawTool, newColor){
    drawTool.setColor(newColor);
};
We also have to add a line to out callback function of the data wrapper shownImageFile. If a new image is loaded it has to be set to the drawing tool.
imageViewer.drawTool.setImage(image);
Adding a mouse listener
In the window building method we use Util.registerExtensionRevocably to add the mouse listener. As first argument it receives ‘PADrend_UIEvent’ which indicates that we register a generic event handler. The second argument is a callback function, which is called when some event occurs. Since we are only interested in mouse events, in the function we first check whether the current event’s type is either Util.UI.EVENT_MOUSE_BUTTON or Util.UI.EVENT_MOUSE_MOTION. Next up we check whether the mouse coordinates are within the image panel. We use the panels absolute rectangle in the test. Since the coordinates are absolute coordinates, but we need them relative to the image panel, we subtracted the upper left corner of the image panel from them. The coordinates are than passed to the current tools delegation method depending on the actual mouse event. For mouse move events we need to access the field buttonMask instead of button since there is no button field in the event object.
Util.registerExtensionRevocably('PADrend_UIEvent',
    [this] => fn(imageViewer, event){
        if(event.type == Util.UI.EVENT_MOUSE_BUTTON || event.type == Util.UI.EVENT_MOUSE_MOTION){
            if(!imageViewer.currentImage || !imageViewer.imagePanel.getAbsRect().contains(event.x, event.y))
                return;

            var x = event.x - imageViewer.currentImage.getAbsRect().getX();
            var y = event.y - imageViewer.currentImage.getAbsRect().getY();

            if(event.type == Util.UI.EVENT_MOUSE_BUTTON){
                if(event.pressed)
                    imageViewer.currentTool.mouseDown(x, y, event.button);
                else
                    imageViewer.currentTool.mouseUp(x, y, event.button);
            }
            if(event.type == Util.UI.EVENT_MOUSE_MOTION){
                imageViewer.currentTool.mouseMove(x, y, event.deltaX, event.deltaY, event.buttonMask);
            }
        }
    }
);
Switching between the tools
To switch between the tools we have to adapt the callback functions of the corresponding tool bar buttons. The only thing we need to do is to set the current tool to the tool associated with the button.
btnDrawTool = gui.create({
    GUI.TYPE : GUI.TYPE_BUTTON,
    GUI.ICON : "#Tut_Pen",
    GUI.TOOLTIP : "Draw Tool",
    GUI.ON_CLICK : [this] => fn(imageViewer){
        btnDrawTool.setSwitch(true);
        btnMoveTool.setSwitch(false);

        imageViewer.currentTool = imageViewer.drawTool;
    }
});

btnMoveTool = gui.create({
    GUI.TYPE : GUI.TYPE_BUTTON,
    GUI.ICON : "#Tut_Move",
    GUI.TOOLTIP : "Move Tool",
    GUI.ON_CLICK : [this] => fn(imageViewer){
        btnDrawTool.setSwitch(false);
        btnMoveTool.setSwitch(true);

        imageViewer.currentTool = imageViewer.moveTool;
    }
});
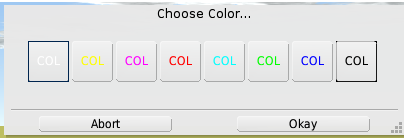
The color choose dialog
The last thing we need to do is the changing of the drawing color. We introduce a dialog to change the color. It should look like in the image below.
For the color dialog we create a new type.
static ColorDialog = new Type();
The dialog needs some attributes. First of all we only allow a fixed number of colors, which are stored in a list. Next up we need some variable that holds the currently selected color. It is initialized by a color passed to the init function. This color will be returned when the dialog is successfully closed. After creating the dialog’s content colorLabels will held a list of buttons that are used to select a color. For returning the selected color we need a point where a callback function can be registered. Therefore we create a Util.MultiProcedure. After creating the dialogs content, we select the button of the current color.
ColorDialog.init := fn(oldColor){
    this.colors := [
        new Util.Color4f(1.0, 1.0, 1.0, 1.0),
        new Util.Color4f(1.0, 1.0, 0.0, 1.0),
        new Util.Color4f(1.0, 0.0, 1.0, 1.0),
        new Util.Color4f(1.0, 0.0, 0.0, 1.0),
        new Util.Color4f(0.0, 1.0, 1.0, 1.0),
        new Util.Color4f(0.0, 1.0, 0.0, 1.0),
        new Util.Color4f(0.0, 0.0, 1.0, 1.0),
        new Util.Color4f(0.0, 0.0, 0.0, 1.0)
    ];

    this.currentColor := oldColor;
    this.colorLabels := [];
    this.onConfirm := new Std.MultiProcedure();

    this.createContent();

    var index = this.getIndexForColor(this.currentColor);
    this.selectColor(index);
};
Create the dialog’s content
The content is held on a panel.
For each color there will be a button.
We can simply create them in a for loop, which iterates over the colors.
For each button its color (which in buttons is the text color) is set.
In addition we set a property, which prevents the buttons text color to switch to white when the mouse courser is on it.
When a button is pressed it sets the current color to their corresponding color.
Therefore to each callback function the buttons index is passed.
In the function a method setting the color is called.
Next up we create a dialog window.
We use a GUI.TYPE_POPUP_DIALOG.
As content we pass the panel with the buttons we have just created.
With GUI.ACTIONS we add the dialog’s Abort and Okay buttons.
Clicking on one of this buttons causes the dialog to shut down.
For the Abort button we do not need to do anything if it is clicked.
However for Okay, we need to return the currently selected color.
Therefore we simply call the multi procedure and pass the color to it.
ColorDialog.createContent := fn(){
    var colorPanel = gui.createPanel(370,60);

    foreach(this.colors as var index, var color){
        var lbl = gui.create({
            GUI.TYPE : GUI.TYPE_BUTTON,
            GUI.COLOR : color,
            GUI.PROPERTIES : [new GUI.ColorProperty(GUI.PROPERTY_BUTTON_HOVERED_TEXT_COLOR, color)],
            GUI.LABEL : "COL",
            GUI.WIDTH : 40,
            GUI.HEIGHT : 40,
            GUI.ON_CLICK : [index, this] => fn(selfIndex, dialog){
                dialog.selectColor(selfIndex);
            }
        });

        this.colorLabels += lbl;
        colorPanel += lbl;
    }

    this.diag := gui.createDialog({
        GUI.TYPE : GUI.TYPE_POPUP_DIALOG,
        GUI.LABEL : "Choose Color...",
        GUI.SIZE : [400, 130],
        GUI.CONTENTS : [colorPanel],
        GUI.ACTIONS : [
            ["Abort",fn(){;}],
            ["Okay", [this] => fn(colorDialog){
                colorDialog.onConfirm(colorDialog.currentColor);
            }]
        ],
    });
};

ColorDialog.init := fn(oldColor){
    this.colors := [
        new Util.Color4f(1.0, 1.0, 1.0, 1.0),
        new Util.Color4f(1.0, 1.0, 0.0, 1.0),
        new Util.Color4f(1.0, 0.0, 1.0, 1.0),
        new Util.Color4f(1.0, 0.0, 0.0, 1.0),
        new Util.Color4f(0.0, 1.0, 1.0, 1.0),
        new Util.Color4f(0.0, 1.0, 0.0, 1.0),
        new Util.Color4f(0.0, 0.0, 1.0, 1.0),
        new Util.Color4f(0.0, 0.0, 0.0, 1.0)
    ];

    this.currentColor := oldColor;
    this.colorLabels := [];
    this.onConfirm := new Std.MultiProcedure();

    this.createContent();

    var index = this.getIndexForColor(this.currentColor);
    this.selectColor(index);
};
Selecting a button
To indicate the currently selected color, we set a border to the corresponding button. This is done by the method setFlag. In the method selectColor, we first of all deactivate the border of all buttons. Then we check whether the passed index is valid. If not, the current color is set to void. Otherwise we set currentColor to the color value that is found at the passed position in the list and add a border to the corresponding button.
ColorDialog.selectColor := fn(index){
    foreach(this.colorLabels as var label){
        label.setFlag(GUI.BORDER, false);
    }

    if(index < 0 || index >= this.colors.size()){
        this.currentColor = void;
        return;
    }

    this.currentColor = this.colors[index];
    this.colorLabels[index].setFlag(GUI.BORDER, true);
};
Open the dialog
The last method we add to our dialog can be used to open the dialog. First of all we create the dialog by calling the init method. Next up we add the passed callback function to multi procedure, so that we can return the selected color. The dialog itself is opened by calling its init method.
ColorDialog.openDialog := fn(callBackFunction, oldColor){
    this.init(oldColor);
    this.onConfirm += callBackFunction;
    this.diag.init();
};
In the image viewer we add a method openColorDialog. It creates a new color dialog with a callback function. In the callback function the pencil color is set.
ImageViewer.openColorDialog := fn(){
    var dialog = new ColorDialog();
    dialog.openDialog([this] => fn(imageViewer, newColor){
            imageViewer.pencileColor(newColor);
        },
        this.pencileColor());
};
This method is called when the Choose Color… item in the settings menu is clicked.
GUI.ON_CLICK : [this] => fn(imageViewer){
    imageViewer.openColorDialog();
}